

Basic configuration of MikroTik router protection: device configuration, firewall configuration, port scan protection, password guessing protection.
? The article gives examples of commands in the MikroTik terminal. If, when pasting a command into the terminal, commands are automatically inserted (while executing you get a bad command name or expected end of command error), press Ctrl+V to disable this feature.
Content
Article in other languages:
?? – Protección MikroTik (configuración básica de seguridad del dispositivo)
?? – Защита MikroTik (базовая настройка безопасности устройств)
?? – MikroTik Protection (paramètre de sécurité de base de l’appareil)
?? – MikroTik-Schutz (grundlegende Geräte Sicherheitseinstellung)
?? – MikroTik Protection (basisinstelling apparaatbeveiliging)
Users
Create a new user with a unique name and remove the built-in default system user account – admin.
[System] -> [Users]
Do not use simple usernames, the password must meet security requirements.
If several users have access to the device, you can specify the rights to the selected user in more detail. Create a new group and define the rights of users of this group.
[System] -> [Users] -> [Groups] -> [+]
Services
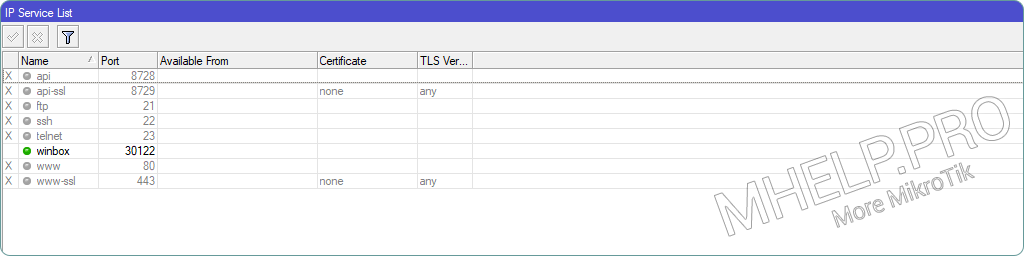
Disable unused services
Disable MikroTik services that we do not plan to use.
[IP] -> [Services]
- api (port 8728) – if we do not use API access, disable;
- api-ssl (port 8729) – if we do not use API access with a certificate, disable it;
- ftp (port 21) – if we do not use FTP access, disable it;
- ssh (port 22) – if we do not use SSH access, disable it;
- telnet (port 23) – if we do not use Telnet access, disable it;
- www (port 80) – if we do not use access via a Web browser (http), disable it;
- www-ssl (port 443) – if we do not use access via a Web browser (https), disable it.
Change Winbox Port
Change the default Winbox port number – 8291, to another free port number – Port (in the example, port 30122) .
[IP] -> [Services] -> [winbox: port=Port]
When changing the port, make sure not to assign Winbox a port used by another service, the list is here.
Update
Vulnerabilities are periodically found in MikroTik equipment (as in the equipment of other network vendors) – timely updates are a necessary measure to ensure device security.
[System] -> [Packages] -> [Check for updates] -> [Check for updates]
If a version update is found, update the device.
? Script Checking for RouterOS update, will send a notification about the release of a new firmware version.
Interfaces
Let’s combine internal (trusted) and external (untrusted) interfaces into lists for the convenience of further management.
List “Internal interfaces”
We put in this list the interfaces of the local network, VPN connections, etc.
[Interfaces] -> [Interfaces] -> [Interface List] -> [Lists] -> [+] -> [Name=InternalInterfaces, Comment="Trusted network interfaces (internal, clients vpn, etc)."]
or:
/interface list add name=InternalInterfaces comment="Trusted network interfaces (internal, clients vpn, etc)."List “External interfaces”
We put external interfaces (Internet, etc.) into this list.
[Interfaces] -> [Interfaces] -> [Interface List] -> [Lists] -> [+] -> [Name=ExternalInterfaces, Comment="Untrusted network interfaces (internet, external etc)."]
or:
/interface list add name=ExternalInterfaces comment="Untrusted network interfaces (internet, external etc)."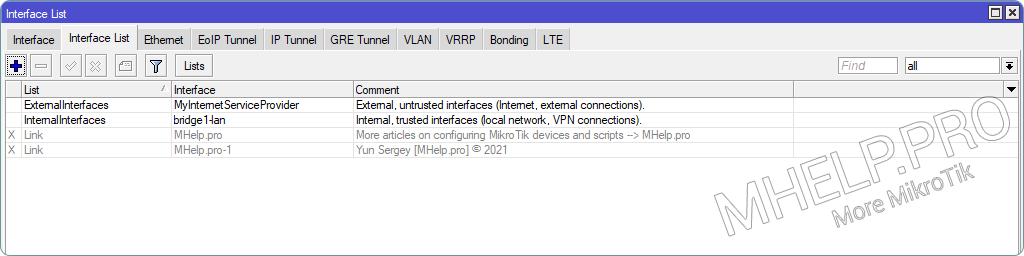
Neighbors
Let’s configure device discovery using Neighbor Discovery only for internal interfaces or allowed interfaces.
Allow detection only from the interfaces listed in the InternalInterfaces list.
[IP] -> [Neighbor] -> [Discovery Settings] -> [interface=InternalInterfaces]
or:
/ip neighbor discovery-settings set discover-interface-list=InternalInterfaces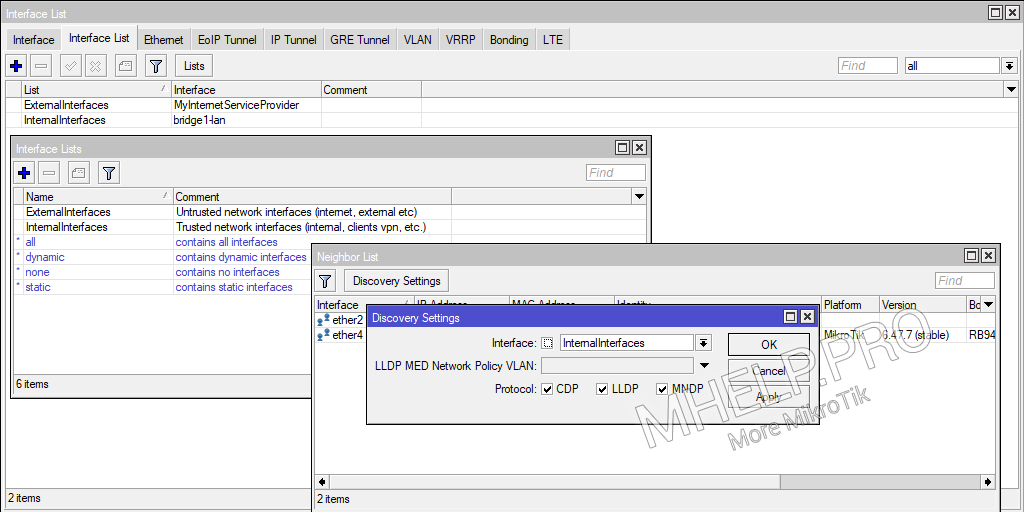
Firewall
We configure access restrictions to the router and network devices using the MikroTik firewall.
⚠️ Before adding restrictive rules – enable MikroTik Safe Mode!
Allow established and related connections
Rule “Trusted” – allow already established and related connections to reduce the load on the central processor of the router.
[IP] -> [Firewall] -> [Filter Rules] -> [+] -> [General: Chain=input, Connection state=established,related; Action: Action=accept; Comment="Rule #0 "Trusted": allow established, related connections."]
or:
/ip firewall filter add action=accept chain=input connection-state=established,related comment="Rule #0 \"Trusted\": allow established, related connections."Place the rule first in the Filter Rules list (place the rule based on its number in the comment).
Drop invalid packages
Rule “Drop Invalid Packet” – drops invalid packets.
[IP] -> [Firewall] -> [Filter Rules] -> [+] -> [General: Chain=input, Connection state=invalid; Action: Action=drop; Comment="Chain: Input. Rule #1 "Drop Invalid Packet": drop packets connection state: invalid."]
or:
/ip firewall filter add chain=input action=drop connection-state=invalid comment="Chain: Input. Rule #1 \"Drop Invalid Packet\": drop packets connection state: invalid." Place the rule after the Trusted rule, in the Filter Rules list (place the rule based on its number in the comment).
Allow ICMP
Rule “ICMP” – allows ICMP traffic to the device.
[IP] -> [Firewall] -> [Filter Rules] -> [+] -> [General: Chain=input, Protocol=icmp; Action: Action=accept; Comment="Chain: Input. Rule #3 "ICMP": accept icmp packets."]
or:
/ip firewall filter add chain=input protocol=icmp action=accept comment="Chain: Input. Rule #3 \"ICMP\": accept icmp packets."Place the rule based on its number in the comment.
Black list
Create list
We create a BlackList, in which we will put IP addresses, which for some reason are denied access to MikroTik or protected devices.
[IP] -> [Firewall] -> [Address Lists] -> [Name: BlackList, Comment="Deny access to the router and local network, from IP addresses from this list."]
or:
/ip firewall address-list add list=BlackList comment="Deny access to the router and local network, from IP addresses from this list."Create rule
Let’s create a “BlackList” rule that rejects requests from IP addresses from the BlackList.
To save CPU resources, place the prohibiting rule in the Prerouting table.
[IP] -> [Firewall] -> [Raw] -> [+] -> [General: Chain=prerouting; Advanced: Src. Address List=BlackList ; Action: drop; Comment="Rule #10 "BlackList": reject the connection with a device from the Blacklist."]
or:
/ip firewall raw add chain=prerouting src-address-list=BlackList action=drop comment="Rule #10 \"BlackList\": reject the connection with a device from the Blacklist." ⚠️ Rules placed in Prerouting are executed before dividing traffic into Input and Forward chains!
Place the rule based on its number in the comment.
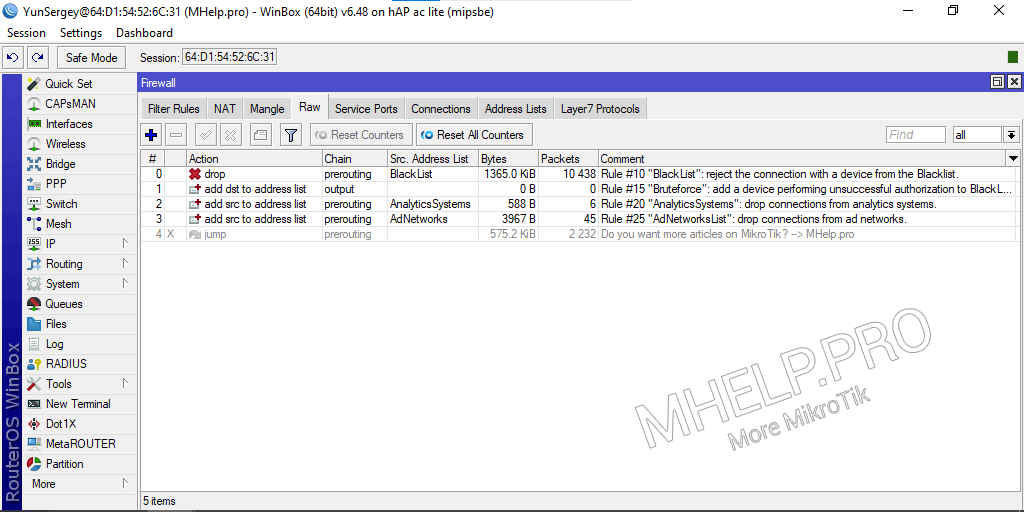
The screenshot shows additional rules:
Block port scanners
Rule of preventive blocking – we block bots/users of devices scanning ports on the Internet to search for vulnerabilities. Let’s make a list of unused ports by our router, add the IP addresses of devices who are trying to access the specified ports in the BlackList.
To protect against scanners that are purposefully looking for MikroTik devices, we will add unused ports (MikroTik services) and the standard Winbox port 8291 (which we changed according to the recommendation) to the list. Let’s add popular vulnerable ports (if the attacker checks these ports on the router, we block all his further actions).
We will apply the rule only for new connections.
Trap TCP ports
- 20 – FTP-DATA;
- 21 – FTP (if you do not use FTP uploading files to the router);
- 22 – SSH (if you do not use SSH router control);
- 23 – Telnet (if you do not use Telnet connection to the router);
- 25 – SMTP;
- 53 – DNS (if your router is not a DNS server for clients from the Internet);
- 80 – HTTP (if you are not using MikroTik control through the browser);
- 110 – POP3;
- 161 – SNMP (if you don’t use remote monitoring);
- 443 – HTTPS (if you are not using MikroTik control through the browser);
- 445 – MICROSOFT-DS;
- 3306 – MS SQL;
- 3128 – Squid;
- 3333 – Network Caller ID server;
- 3389 – Microsoft Terminal Server (RDP);
- 7547 – TR-069 (if not using the CWMP control protocol);
- 8291 – Winbox (default port);
- 8080 – 8082 – Web прокси (if you do not use Web Proxy MikroTik).
Create rule
We put the IP address of the untrusted device in the BlackList, for 10 hours:
/ip firewall filter add action=add-src-to-address-list address-list=BlackList address-list-timeout=10h chain=input protocol=tcp connection-state=new dst-port=20-25,80,110,161,443,445,3128,3306,3333,3389,7547,8291,8080-8082 comment="Rule #1 \"Block TCP port scanning\": add a device scanning an unused port to BlackList." Place the rule by its number in the comment.
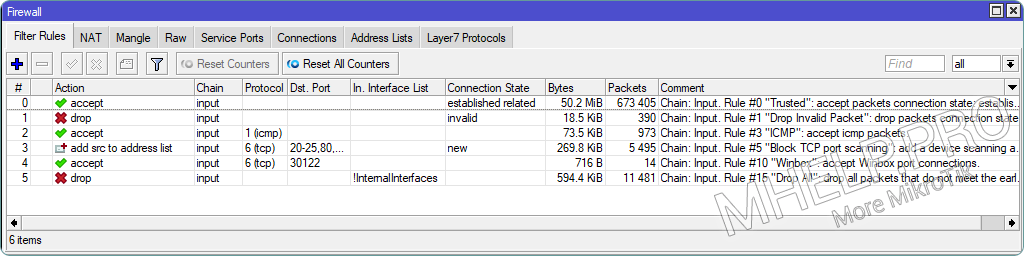
? For 10 hours in BlackList there are about 500 IP addresses performing attempts to scan “vulnerable ports” of the MikroTik device.
Allow Winbox Port
Rule “Winbox” – allow connection to the Winbox port (in the example – 30122).
[IP] -> [Firewall] -> [Filter Rules] -> [+] -> [General: Chain=input, Protocol=tcp, Dst. Port=30122; Action: Action=accept; Comment="Chain: Input. Rule #10 "Winbox": accept Winbox port connections."]
or:
/ip firewall filter add chain=input protocol=tcp dst-port=30122 action=accept comment="Chain: Input. Rule #10 \"Winbox\": accept Winbox port connections."Place the rule based on its number in the comment.
Drop not allowed connections
Rule “Drop all” – we will drop all connections that were not allowed before and are not included in the list of trusted (internal) interfaces (InternalInterfaces).
[IP] -> [Firewall] -> [Filter Rules] -> [+] -> [General: Chain=input, In. Interface List=[!]InternalInterfaces; Action: Action=drop; Comment="Chain: Input. Rule #15 "Drop All": drop_all packets that do not meet the early conditions, except from trusted interfaces."]
or:
/ip firewall filter add action=drop chain=input in-interface-list=!InternalInterfaces comment="Chain: Input. Rule #15 \"Drop All\": drop_all packets that do not meet the early conditions, except from trusted interfaces."Place the rule at the last position in the Firewall Filter Rules
Blocking Bruteforce
Rule “Bruteforce” – put the device’s IP address in the BlackList, if an second attempt to authorize on the device fails.
If an authorization attempt is unsuccessful, MikroTik sends a response with the text “invalid user name or password” to the requesting device.
We put the IP address of the device in the BlackList, for 70 minutes.
[IP] -> [Firewall] -> [Raw] -> [+] -> [General: Chain=output; Advanced: Content="invalid user name or password"; Action: Action=add-dst-to-address-list; Address List=BlackList, Timeout=01:10:00; Comment="Rule #15 "Bruteforce": add a device performing unsuccessful authorization to BlackList."]
or:
/ip firewall raw add chain=output content="invalid user name or password" action=add-dst-to-address-list address-list=BlackList address-list-timeout=1h10m comment="Rule #15 \"Bruteforce\": add a device performing unsuccessful authorization to BlackList."? MikroTik protection (basic device security setting), discussed in this article. I hope you have now been able to configure router services and firewall rules by improving the protection of the MikroTik router and LAN devices. However, if you run into any problems while setting up, feel free to write in the comments. I will try to help.